Chapter 37
Salamanca
June-July 1812
See
Battle Plan
|
For
some time after Marmont’s retreat to Salamanca,
Wellington remained at Fuente Guinaldo assessing his future
strategy. Finally, on 7th May he ordered Hill who was
still in Estramadura covering Badajoz, to attack and destroy
the bridge at Almarez since it was the main communication
available to the French across the Tagus River. At the
same time, Graham was to take two Divisions south of the
Tagus to provide support for Hill if necessary. Hill’s
expedition was a complete success and the bridge was destroyed
on 19th May, after which he retreated by two forced marches
to the safety of Truxillo. Wellington then ordered the
allied bridge at Alcantara which had been destroyed in
1809, to be repaired. This was completed by the end of
May.
On June 13th once Wellington had gathered his army together,
he marched into Spain with all 7 Divisions via Ciudad
Rodrigo in three columns. The left column consisted of
Graham's 3rd Division, Pack and Bradford's Brigades and
Anson's Brigade of cavalry. They advanced via San Munoz,
Robliza and Calcadilla, where they were ordered to cross
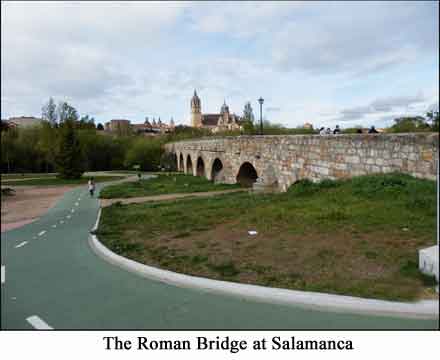
the Tormes river below Salamanca at the ford of El Canto
on the morning of 17th June and take up position on the
heights opposite to the gates of the fort of San Vincente.
Pack was cantoned for the next 10 days in the villages
of Villa Major, Villares de la Reyna, Castellanos de Morisco
and villages to the left of the road to Toro. |
 |
The inhabitants
gave Wellington a hero’s welcome. There were three
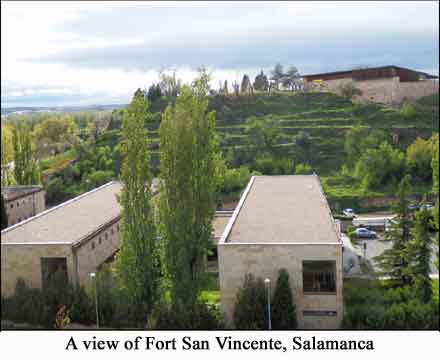
forts on the south west corner of the city – San
Vincente, San Cayetano and La Merced. Trenches and batteries
were immediately constructed, but the siege equipment
was too lightweight and insufficient to be effective.
Wellington positioned his army north of Salamanca on the
slopes of San Christobel. Marmont had at first retreated
before finally concentrating his army at Fuente Sauco
but on the 20th June was formed up so close that Wellington
had to assume his battle position with 5 of his Divisions
and the 2 Independent Portuguese Brigades. The order from
right to left was 1st; 7th; 4th; Light; 3rd; Pack; Bradford.
At dusk the French occupied the village of Castellanos
de Morisco in front of the right centre and then advanced
and attacked Morisco which was at the foot of the hill
and occupied by the 68th Regiment who successfully defended
their position. The French didn’t press home their
attack and only skirmishing took place over the following
|
days. On 23rd June Wellington ordered San Cayetano to
be stormed but it was unsuccessful with a loss of 6 officers
and 120 men. However, on the 26th June a convoy arrived
from Almeida with the heavy siege guns and equipment and
that same afternoon the attack on the forts continued.
The effect, particularly of red hot shot on the wooden
roofs of San Vincente was devastating. The bombardment
continued on the following morning of the 27th June and
Wellington ordered the forts to be stormed again but both
San Cayetano and San Vincente surrendered first, without
a fight. |
Once it became apparent
to Marmont that the Salamanca forts had fallen he immediately
retreated north across the Douro towards Valladolid where
he had his depots. On 1st July he was at Rueda close to
the Douro. Wellington followed Marmont north and by the
7th July the 2 armies were facing each other across the
Douro on a line of some 15 miles. Wellington’s left
consisted of the 3rd Division, Pack’s and Bradford’s
brigades, Carlos de Espana's Spaniards, and Marchant and
Bock’s heavy dragoons lay near the point where the
Trabancos river falls into the Douro near the ford of
Pollos. The Light, 4th, 5th, and 6th Divisions forming
the right wing lay opposite Tordesillas with Rueda and
La Seca behind them. The reserve, of the 1st and 7th Divisions
were quartered at Medina del Campo ten miles to the rear.
It is worth noting that on 28th June Wellington’s
brother in law Edward Packenham took command of the 3rd
Division following General Graham’s return to England
with an eye |
 |
infection.
Wellington was now without some of his most senior and
trusted officers – Crauford was dead and Picton
and Graham invalided. On 10th July, less than a fortnight
later, Lt Colonel John Gomersall was transferred from
the 16th Regiment in Pack’s brigade to command the
21st Portuguese Regiment which formed part of Power’s
Brigade, attached to the 3rd Division under Packenham,
still part of Wellington’s left wing. On 15th July
Marmont ordered two Divisions on his |
 |
right to cross the
Douro opposite Wellington’s left wing, threatening
to advance on Salamanca. However, this was only a feint
and on the night of 16th/17th he ordered the same two
Divisions back over the bridge which was afterwards destroyed.
At the same time, the rear of the army (Clausel &
Maucunes Divisions) was ordered to cross the Douro at
Tordesillas on Wellington’s right which he had moved
west to meet what he thought was Marmonts move on his
left. After much movement and skirmishing, Wellington
finally on the 18th July, assembled on a strong defensive
position between Castrillo on his left and Vallesa on
his right with his centre at Canzil behind El Olmo. [John
Gomersall's 'Statement of Service refers to him commanding
at Toro prior to Salamanca. Presumably this is reference
to Marmont's attack across the Douro at Toro on the 15th
July which was in fact a feint and caused Wellington to
move the 3rd Division, in which John Gomersall now commanded
the 21st Regiment, further to the west near Castrillo.
On the |
morning
of the 19th the two armies, each of approximatelty 50,000
men, faced each other across the Guarena river. However,
at 4 pm the French army fell into column and moved off
south until it lay between Tarazona and Cantalopiedra.
Wellington then made a parallel move. On the 20th the
French continued their march south, Marmont trying to
turn Wellington’s left wing and cut his communications,
in his turn Wellington continued to march south in parallel.
Wellington had his troops in three parallel columns, the
first nearest the French being the 1st, 4th, 5th and Light
Divisions; the second being the 6th, 7th, Pack and Bradford’s
Brigades; with the 3rd Division and Espanas Spaniards
formed a reserve farthest from the enemy. By the end of
the next day Marmont was at Babila Fuente quite close
to the ford over the Tormes river at Huerta. Wellington
was on the heights above Cabeza Vellosa and in danger
of having his right turned. On the 21st he withdrew his
whole army to the heights above San Christobal while the
French crossed the Tormes river at Huerta and higher up
at La Encina. Wellington allowed his army to rest and
then in the afternoon crossed the Tormes himself at the
fords of Cabrerzos and Santa Marta leaving the 3rd Division
on the north of the river to cover his rear. |
On the
22nd, Marmont was under the impression that Wellington
was about to retreat and despite the fact that he was
unable to see the position of all Wellington’s troops
thought he was in a position to cut off his rear Divisions
and as a consequence proceeded to march his army across
Wellington’s front. Edward Packenham and the 3rd
Division (which included John Gomersall commanding the
21st Regiment) who had just marched through Salamanca
and crossed the Tormes that morning was as it turned out,
on a collision course with Marmont’s vanguard. At
around 4pm, Wellington, spotting Marmont’s weakness
in stretching out his forces too far across his front,
famously threw away a chicken leg he was eating and rode
the two or three miles over to Edward Packenham, ordering
him to advance with the 3rd Division, attack Thomieres
Division and ‘drive all before him’. Then
the 5th Division was to attack Maucune’s Division
followed by the 4th and Pack’s Brigade. The heavy
cavalry joined in and soon Maucune’s and Thomieres
|
 |
Divisions
were completely broken and in retreat. The 6th and Light
Divisions were also launched on the French right. The
result was a complete victory for Wellington taking 7,000
prisoners and 20 guns with 7,000 French casualties against
5,000 British. Marmont was forced to retreat rapidly northeast
towards Arevalo where they were only able to muster 20,000
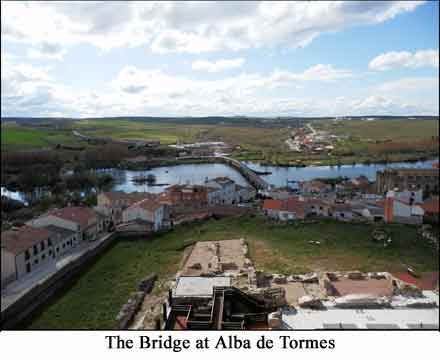
effective troops. Wellington followed in pursuit across
the fords at Alba de Tormes and La Encina on the following
day with Anson’s and von Bock’s Dragoons followed
by the 1st and Light Divisions. When they reached Garcia
Hernandez, they caught up with two squadrons of French
dragoons and two infantry battalions resulting in a spectacular
victory for the British dragoons with over 1,100 French
casualties or prisoners. That night the vanguard and headquarters
was in Flores de Avila, they gave up the pursuit on 25th
and moved the headquarters to Arevalo on the 27th and
Olmedo on the 28th. Wellington crossed the Douro on the
29th at Boecillo at which the French evacuated Valladolid
and retreated to Lerma, Torqemada and Santa Maria del
Campo.
[John Gomersall was commanding the 21st Portuguese Infantry
Regiment which was part of Power’s Portuguese Brigade
attached to Packenham’s 3rd Division. So although
John Gomersall's 'Statement of Service' is correct in
placing him in command at Salamanca, he was commanding
the 21st not the 16th Regiment.] |
Maps
Photos
|